Just this week I was trying to load an old WordPress website I had lurking locally on my PC. I hadn’t touched it in months to the point where I forgot what stage of development I was on. My setup in this case was a Xampp server and through it I would load both Apache and MySql, then open up PhpMyAdmin and just fiddle in there. Straight away I was facing an issue when clicking on the Start button in Xampp to fire up MySql. Don’t know what was up with it so naturally I opened up the mysql_error.log file. There were a bunch of different ones but the predominant one was this one.
[ERROR] InnoDB: Page [page id: space=0, page number=307] log sequence number 45608603 is in the future! Current system log sequence number 45109372.
[ERROR] InnoDB: Your database may be corrupt or you may have copied the InnoDB tablespace but not the InnoDB log files. Please refer to https://mariadb.com/kb/en/library/innodb-recovery-modes/ for information about forcing recovery.
Without sounding like a MySql expert (because really and truly I’m not and the only times I ever used was for little WordPress projects) the solution that worked for me was stopping anything that was running on Xampp and open command prompt in admin mode. I would then simply execute the following command.
mysqld --skip-grant-tables
MySql would then show as running on Xampp, if Apache was not running then turn it back on, and hopefully you should be able to navigate to http://localhost/phpmyadmin/. Hope this was useful as it was to me, thanks for reading!
Hey everyone and welcome back to another blog post. Today’s topic is source control and how does one go about pulling a particular file, or a collection of files within a directory, from a remote branch into your local branch. Thankfully the answer is rather straight forward and not so complex as I thought it would be.
First thing you want to do is make sure there are no uncommitted changes in your repository. Then, even though not necessary, pull the latest changes by running this command.
git fetch
Then let’s say we have the following structure in the remote branch.
root
foldera
file1
file2
folderb
file3
file4
file5
If you’re interested in retrieving folderb and all it’s contents then execute this command.
git checkout origin/master -- folderb
Otherwise if you’re interested in just file3 then execute this command.
git checkout origin/master -- file3
That should do the trick!
For the sake of better SEO ranking I’m going to shamelessly include a couple of internal links, so in case you’re having issues splitting a big pull request into small ones then click here. Alternatively if you want to remove a specific file from a pull request then click here.
Some months ago I was tasked to develop a proof of concept Angular application but using a Module Federation approach. I have to admit that I’m not much of a front end developer myself, and I tend to code back end applications (as the blog suggests) but I like a challenge, and an opportunity to learn something new. The idea of Module Federation is to have applications built, deployed and run individually, but thanks to a “host”, so to speak, we can have an application run within another. I believe that Module Federation isn’t limited to Angular only but it can be applied to React and VueJS. If you’re coming from a back end background, think of like a standard .NET application where you’ll have the main application, or API, and then you’ll have multiples DLLs that support the solution but said DLLs can also be used in other solutions, with the only difference that in Module Federation these separate DLLs can also run on their own as independent applications.
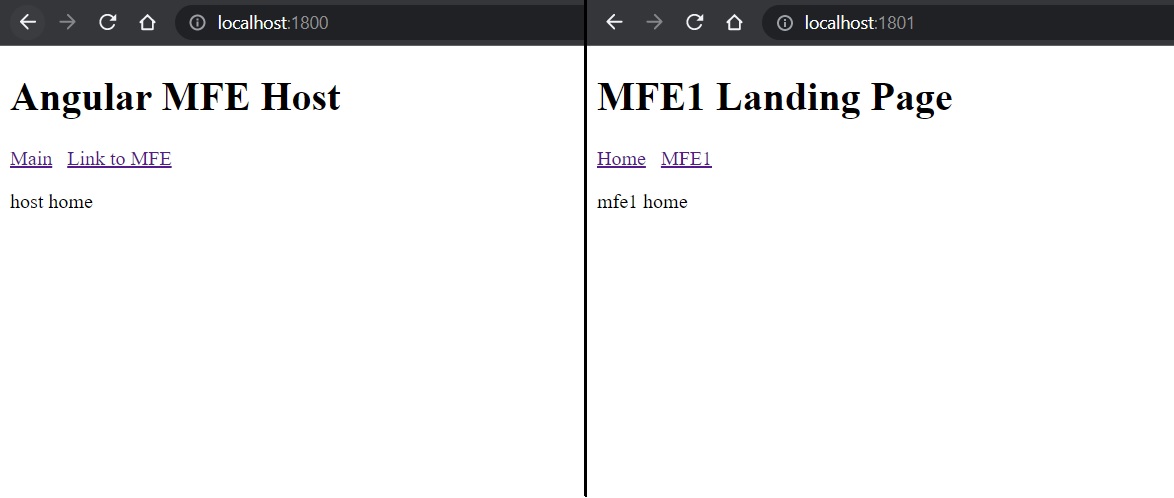
Anyway, I was new to this so naturally I resorted to a tutorial online and whilst there are numerous examples out there I decided to stick with this one. This tutorial will be the starting point for this blog post. After completing the tutorial, you should have an Angular application with host and mfe1, as micro front ends, and when you run the application using your ng serve commands you should have something like the following.
In Module Federation applications should be de-coupled and should not share dependencies between them, especially npm packages, but I found that certain assets, such as images or CSS files, can and wouldn’t hurt to have them shared between different micro front ends. My interpretation of this new framework might be complety wrong and if that’s the case then my bad.
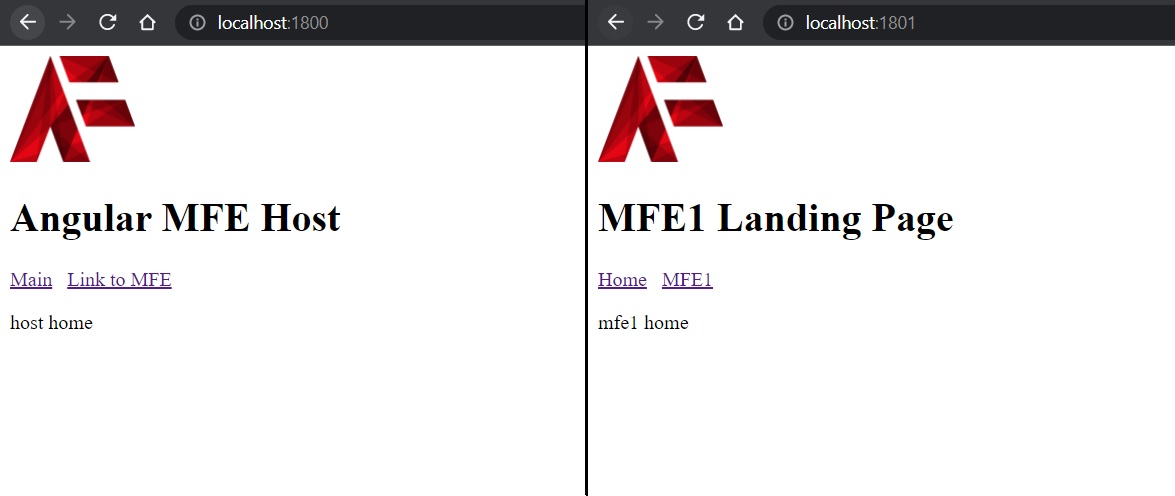
Images
The first asset I wanted to have in common between projects was an image. To achieve this, I created a new common folder inside the projects folder that lies within the root. Inside the common folder I added a new assets folder and inside that one an images folder. I then headed to cleanpng.com and got myself a random logo.
First code change is happening in angular.json. In here, for each project (in our case two; host and mfe1), you should have build, running, serve configurations, among other things. We need to make an update to the assets JSON node in each project. The default should reference the favicon and the assets folder found inside the src folder of each project. We need to add a reference to the assets folder (inside common project) we just created, and give it an alias to be used in our HTML files. This needs to be done for both host and mfe1.
This file contains bidirectional Unicode text that may be interpreted or compiled differently than what appears below. To review, open the file in an editor that reveals hidden Unicode characters.
Learn more about bidirectional Unicode characters
I then updated each of the project’s app.component.html, which is like each project’s entry point. I added an image HTML tag and referenced the directory we just declared in the angular.json file.
This file contains bidirectional Unicode text that may be interpreted or compiled differently than what appears below. To review, open the file in an editor that reveals hidden Unicode characters.
Learn more about bidirectional Unicode characters
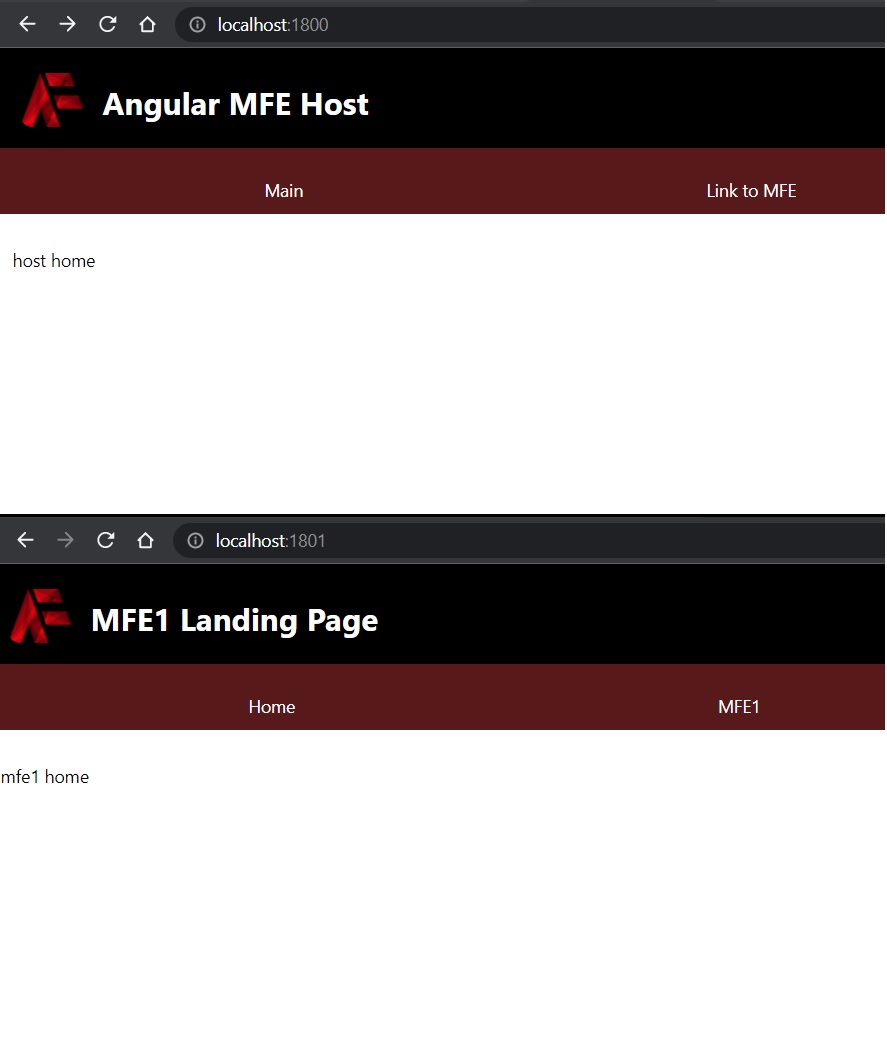
The second asset I wanted to have shared between the project was CSS. From the research I did some weeks ago I found that there are various ways to achieve this, definitely easier than the images, but the following was what I found suited best for me. I added my CSS styling in styles.css in the host‘s src folder. I then went back to the angular.json file and for each non-host project (in our case just mfe1) I added, just under where we just did our updates, a reference to the style.css file found in the host project.
This file contains bidirectional Unicode text that may be interpreted or compiled differently than what appears below. To review, open the file in an editor that reveals hidden Unicode characters.
Learn more about bidirectional Unicode characters
As you can see there’s also a reference to the assets change we did earlier. I then updated further the app.component.html files of each project, and added new HTML tags that reference the new CSS classes. Some basic styling, nothing out of this world. That left me with the following looking micro front ends.
Now I know that my implementation is incorrect for Module Federation, in the sense that the host and other “children” micro front ends would not share the same styling because the “children” micro front ends would be contained within the host. For that reason it wouldn’t make sense to have a nav bar within a nav bar as is in this case, but for the sake of a POC we’ll let this one slide. Besides, it can still be the case that a CSS class is used in multiple micro front ends, so in that instance all we need to do is reference the stylesheet from within angular.json.
I took the liberty of uploading the codebase to a public repository on my GitHub account. That brings us to an end of another blog post. Thanks for reading.
Recently I was working on some Cypress tests, the first time I used them if I had to be honest, and I came across an issue. I wanted to run the test files individually but when I tried the solutions I found on the internet (StackOverflow and so on), no one of them worked for me. My setup was very bare, I didn’t even have a front end project as my tests involved sending requests to an API and asserting the HTTP responses, and the JSON values in the body. Being very new to Cypress I’m not sure if the following is the right way to go but I was executing the tests using command prompt and then reading the results using MochAwesome and an HTML file it produced. When researching online I read that there’s a some sort of a UI for running tests and reading results, but that was not my approach.
Instead I went for this approach. Inside the integration folder I created subfolders for each environment I wanted test. That is the reason why I had separate, individual files. Different environments have different credentials and environment variables. In the individual subfolders I had my JS test file. So roughly, my directory was like this
Once I had that setup all I had to do was execute the following command on cmd.
npx cypress run --spec "cypress/integration/development/**"
Worth noting that if there had to be more than one JS test file inside a particular subfolder, say development, in that case all of the JS test files will be executed so yes I admit, technically speaking the title of this blog post isn’t accurate because this solution works for just one JS test file per subfolder, but hey who’s not guilty of implementing a not so clean solution?
Anyway, thanks for reading and I hope this is useful to some frustrated developer who can’t find a way to run cypress tests the way he/she wishes.
Today we shall be discussing caching. The concept of caching is rather straight-forward. The idea is to store your data on a faster secondary source, typically in memory, and not just on your primary data source, typically database. That way when your application receives requests, the data is pulled from the faster source and therefore faster response time.
In .Net Core there are two options, memory or distributed caching. Memory caching is as the name implies, in memory and it’s contained within the memory of the web server the application is running on. If your application runs on multiple web servers then distributed caching (or sticky sessions) would be a better option. Distributed caching makes your application scalable, allows session data to be shared between the web servers and does not reset when a new version is deployed. Both types of caching store values as key-value pairs. In this post I will be using Redis as my choice for distributed caching. But what if we use them both at the same time? Here’s a small POC to show how they can work together.
I created a new .Net Core solution and selected the API template. This template comes with a default WeatherForecast controller and I used that as my skeleton to implement memory and distributed caching. I figured that the temperature is a realistic value that can be cached for a few minutes since it’s not a value that changes rapidly.
I left that untouched for now and instead created a class library to act as my business layer. In there I added a new interface and this will act as my caching service. In here I implemented the following logic; check if key is in the memory cache and if found return value. If key not found then check in distributed caching and if found return value. If key not found then look up value from primary source and save value in both memory and distributed caching. In order to connect to Redis I had to download and install the Nuget package StackExchange.Redis.
This file contains bidirectional Unicode text that may be interpreted or compiled differently than what appears below. To review, open the file in an editor that reveals hidden Unicode characters.
Learn more about bidirectional Unicode characters
I decided to choose an API HTTP request as my primary source instead of a database call. Sticking with the weather theme I decided to consume the Open Weather API to get that feeling of playing around with live data. Because the second parameter in the caching service endpoint is a function, I created a new weather service whose responsibility is to consume the Open Weather API. Like I said earlier this function could be a database call. In that case we would need to inject the function that retrieves the data. For completeness sake and just in case anyone would want a code snippet how to consume the Open Weather API, here’s my implementation.
This file contains bidirectional Unicode text that may be interpreted or compiled differently than what appears below. To review, open the file in an editor that reveals hidden Unicode characters.
Learn more about bidirectional Unicode characters
I then updated the default WeatherForecast controller to use the caching service and weather service. Originally this was returning some random data and was not connected to any data source whatsoever.
This file contains bidirectional Unicode text that may be interpreted or compiled differently than what appears below. To review, open the file in an editor that reveals hidden Unicode characters.
Learn more about bidirectional Unicode characters
The services were injected in the WeatherForecast controller using dependency injection and therefore I had to update the ConfigureServices method inside the Startup class and instantiate both services. I also added a reference to the memory and distributing caching services.
This file contains bidirectional Unicode text that may be interpreted or compiled differently than what appears below. To review, open the file in an editor that reveals hidden Unicode characters.
Learn more about bidirectional Unicode characters
Last but not least I also created some unit tests to wrap everything up nice and easy.
This file contains bidirectional Unicode text that may be interpreted or compiled differently than what appears below. To review, open the file in an editor that reveals hidden Unicode characters.
Learn more about bidirectional Unicode characters
You can find the entire solution in one of my Github repositories and feel free to test it out or make your own changes. This was just a proof of concept and can certainly do with some improvements such as storing sensitive keys or connection strings in a more secure location, or supplying two different expiry times for the memory and distributed caching. Equally the caching service could easily be put inside a “common” project and then re-used as a nuget package/artifact by different solutions.
That’s a wrap for today and I hope you enjoyed this blog post. Don’t be shy to leave any comments or get in touch if anything is unclear.